Wednesday, October 31, 2012

Digital Delights New Christmas Treats

Digital Delights just released new images this week ready for your Christmas cards. I have the pleasure of using Peeking Baby.


I have to say that I would not normally make a pink Christmas card, but I found this great pink snowflake paper and new I had to have it.  Mixed with Melon Mambo (which is kind of red on the pinky side) it looks okay.


Card Recipe
Images: Peeking Baby
Paper: SU Melon Mambo, Cratepaper.com Snow Day
Markers/Ink: Copics - R35, R37, R39, E15, E11, R20, Y17, Distress Broken China
Embellishments: Spellbinders Decorative Labels 8, Snowflake punches, Prima Pearls, craft ribbon


Challenges for this card:
Be sure and take a look at what the wonderful Design Team has come up with for your inspiration.  And then hop over to the Delightful Challenges site and check out this weeks challenge.


Have a Great Day!
NancyD

Tuesday, October 30, 2012

Beary Dragon Fly

This is a really cute little bear from Bugaboo dressed as a Dragonfly for Halloween.  Although, I didn't really use fall colors - I am a little too partial to teal.


I added Stickles to the wings for a bit of sparkle.  Since I used butterfly paper, I thought I should add a few butterflies around the bear.

Card Recipe:
Image: Bugaboo
Paper: Bazzill, My Minds Eye Miss Caroline
Markers/Inks: Distress Broken China, Copics - R81, BG10, BG11, BG13, BG15, E11, E13, E15
Embellishments: Spellbinders Decorative Label Eight, Sizzix Butterfly die, lace, MS edge punch, Stickles


Our sponsor this week is Bugaboo. Hop on over to the Creative Craft Challenge blog and check out all the great inspiration by the Design Team.

Challenges for this card:
Have a Great day!
NancyD

Monday, October 29, 2012

As For My House.....

The theme this week at Love to Create is "layers".  My card has a few layers of die cuts and is an easel card.  Fresh Brewed Designs is the sponsor with a generous prize.


Card Recipe:
Image: Fresh Brewed Designs House on the Hill and Sentiment
Paper: Bazzill, Basic Grey Boutique Shopping
Markers/Inks: Distress Forest Moss
Embellishments: Spellbinders Grand Decorative Ovals and Decorative Labels One, Really Reasonable Ribbon, Pins, Wild Orchid flowers, SU pearls


Our sponsor this week is Fresh Brewed Designs. Hop on over to the Love to Create challenge blog and check out all the great inspiration by the Design Team.

Challenges for this card:
Have a Great day!
NancyD

Sunday, October 28, 2012

Box and Christmas Tree Tutorial

Today I am the hostess for Hostess Monday over at Digital Delights.  I decided to try another tutorial and I came up with a great 3-D Christmas tree to used in a box scene.

I have had this scene on my mind for some time and I finally had time to work on it.  I got the tree idea from a card that a fellow blogger made last year. Her tree was flat, but I envisioned it in 3-D. The box is a typical Exploding Box with two sides glued together to form the room for the scene.


Box Instructions


  • My box is a bit larger than normal. Cut 3 pieces of the base cardstock 5" by 12".  Score all three at 5" width wise. The 5" piece forms the base of the box.  
  • Cut 1 piece of the base 5 1/2" by 12.  The extra 1/2 inch is to be glued to an adjacent piece. Score this piece at 5" width wise and the extra 1/2" on the long side.  Cut off the 5" portion of the long scored strip.
  • Apply strong glue tape to the 1/2" portion. 
  • Decorate the outside of the box sides.  I used Bazzill Red and DD Winter Wonderland digital paper.
  • Glue the larger box side to one of the other box sides so that they are securely connected.
  • Cut a piece in an alternating color for the box lid - 8 1/4" square.  Score this piece at 1 1/4" on all four sides. Cut through a short piece of the lid edge as shown.  At this point you might want to decorate the edges of the lid.  I used a Martha Stewart edge punch on my edges.
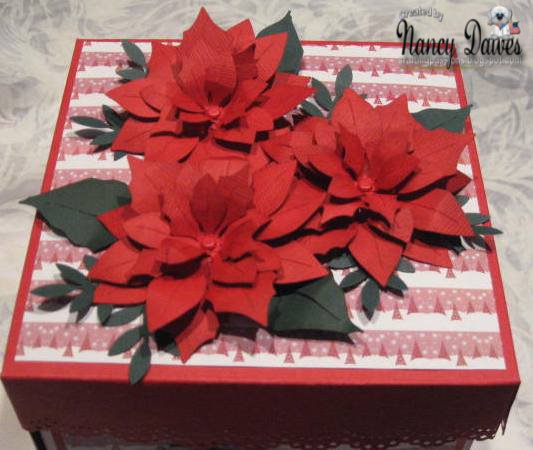
  • I decorated the outside of the box and lid with BossKut Poinsettias and lot's of leaves from MS Leaf and Cottage Cutz Greenery.
  • I also cut out circles and a lacy circle for the sentiment from DD Naughty or Nice Sentiment Set


Christmas Tree


To make the tree I used a paper cone base and lots and lots of Martha Stewart sprigs.


  • Cut a half circle of your tree base paper.  I used a dinner plate as my template. The radius of the tree should not exceed the size of your box so mine is 5 1/2".
  • Cut about 1/3 of the half circle away and apply strong glue tape to one edge.
  • Roll the half circle around until the edges overlap and secure the glue tape to the other side.  This makes a perfect cone that will stand on its own.
  • Next punch dozens of little sprigs. I used two different colors of green card stock.
  • Begin to glue the sprigs around the cone in rows.  You can also glue sprigs to sprigs to extend the width of the tree.
  • Keep gluing until you have covered the whole cone.


Creating the Scene

In my minds eye I wanted to create an indoor scene of the family decorating the Christmas tree.  One of my fondest memories growing up is of my mom and grand parents decorating the tree a few weeks before Christmas. They would dance around the room to wonderful music putting everything on the tree in just right place.  The room would sparkle from fire light bouncing back from the brightly colored ornaments and tinsel around the tree.  Fire crackled and the whole house smelled of cinnamon and fresh baked cookies.


When the lid is removed, two sides drop down to expose this wonderful scene. I plan to use this as a decoration on one of my side tables in December.


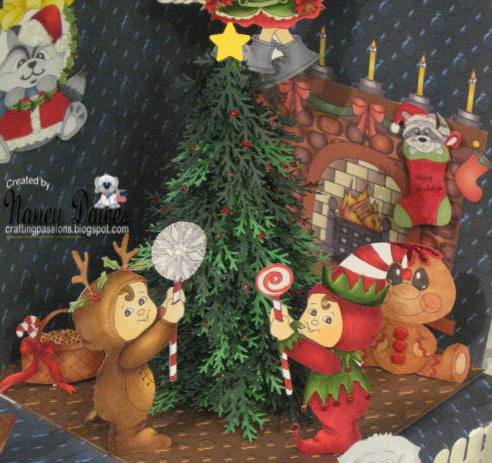
Here is the tree in the process of being decorated.
You can just see the Christmas Fireplace in the background .
Outside the house is the Post Girl delivering Christmas cards and letters.
She is greeted by the family dog! (the dog and lamp are from Carolers Accessories)


Joyful Joey will hang the candy canes on the tree.

The Christmas angel is played by Joyful Jamie suspended from the edge of the box with wire.

Wreath Racy hangs on for the fun!

The Christmas Kids are ready to decorate the tree.

A Touch of Christmas Sentiment Set

Ginger Baby enjoys the scene from the comfort of the hearth.

Ridley Stocking is hung by the fire.

A basket of cookies from the Carolers Accessories Set.
Well that is my Christmas scene with a box and tree tutorial.  What do you think?

Project Recipe
Images:  All images are Digital Delights
Paper: The base is made with Very Vanilla, the outside paper is Winter Wonderland and the paper inside is DD Baubles and Tree Paper Pack
Markers/Inks: Distress Brick Red and lots of Copics (my favorite reds - R32, R35, R37, R39, favorite greens - G20, G21, G24, G99, skin - E00, E01, Hair - E50, E53, E57, favorite blues - B93, B95, B97, B99, other colors to round out the scene include C1, C3, C5, C7, Y11, Y13, Y17, Y28, E11, E13, E15, E17, E18, E21, E23, E25, E27
Embellishments: Spellbinders Circle and Lacy Circle, Holly Accents, and BossKut Poinsettia die, MS Leaf punch, Cottage Cutz Greenery, Prima Pearls, Stickles red, gold and silver


Challenges for this Project:
Hope you enjoyed my two little tutorials today. It would be wonderful to see more of these Christmas trees popping up in blogland.

Have a Great Day!
NancyD

Wednesday, October 24, 2012

Christmas Cup of Tea


I've got another Christmas card to share for my Digital Delights DT this week.  I used the new Teacup Slippy image with less traditional holiday colors.  I really like how this one turned out.


Card Recipe
Paper: Bazzill, Graphic 45 Chrismas Past, Kaiser Kraft Deck the Halls
Markers/Ink: Copics - R35, R37, R39, E31, E33, E35, Y38, C1, C3, C5, C7, Distress Broken China
Embellishments: Spellbinders Label 18, Snowflake punches, Prima Pearls, craft lace and ribbon, MS stars edge punch, Pearl Pin, Stickles, Die-Namics Decorative Doily die


Challenges for this card:
Be sure and take a look at what the wonderful Design Team has come up with for your inspiration.  And then hop over to the Delightful Challenges site and check out this weeks challenge.


Have a Great Day!
NancyD

Monday, October 22, 2012

Love to Create - Pumpkins

Our challenge this week at Love to Create is Pumpkins with sponsor Crafty Sentiments.


I didn't have a pumpkin die so I made my pumpkin with three Spellbinders Ovals.  You can't really see it in the picture but I put Distress Spiced Marmalade on the edges of the oval pieces to give more dimension.


Card Recipe:
Image: Crafty Sentiments
Paper: Bazzill, Graphic 45
Markers/Inks: Copics - Y01, Y12, Y14, Y18, E01, E57, E53, E50, E11, 
Embellishments: Spellbinders ovals and Decorative Labels One, Really Reasonable Ribbon, Pin, SU pearls


Our sponsor this week is Crafty Sentiments. Hop on over to the Love to Create challenge blog and check out all the great inspiration by the Design Team.


Challenges for this card:
Have a Great day!
NancyD

Sunday, October 21, 2012

Mountain Maggie


Majestic Mountains is the theme this month over at Craft a Scene and this is the third week of the challenge.

I have had this scene rolling around my brain for some time and I finally had a chance to get it out!  This Magnolia Tilda is perfect for tip toeing through the creek coming off my majestic mountains. I do think, however, that the water may be a bit cold!


Most of the stamps are Stampscapes with one Sutter (the grassy brook) and of course Tilda. The rocks at the bottom around Tilda are Art Impressions.


Card Recipe:
Images: Stampscapes, Sutter, Art Impressions and Magnolia
Paper: Cryogen White for the scene, Glossy black and Bazzill brown
Inks: PanPastels colored the whole scene, White gel pen for the highlights, Copics for Tilda - V25, V20, E00, E01, E11, E50, E53, E57


Have a go at making your own mountain scene and then enter it into the challenge over at Craft a Scene.  Don't forget to add GDT to your entry should you wish to be a guest designer.


Challenges for this project:

Have a great Sunday!
NancyD

Wednesday, October 17, 2012

Happy Birthday Josh!

My card today is for a boy's birthday.  I love this little guy and his piece of cake.  I had a fun time coloring him up and using some old paper that matched the colors that I wanted to use.


Card Recipe
Paper: Bazzill, Miss Caroline's
Markers/Ink: Copics - R22, R24, R29, B0000, B00, B01, B02, B04, YG21, YG23, TG24, Y00, Y08, W00, W01, W05, W08, E53, E59, Distress Broken China
Embellishments: Doodlebug Designs Sugar Coated Brads, My Minds Eye Lemon Twist Twine


Challenges for this card:
Be sure and take a look at what the wonderful Design Team has come up with for your inspiration.  And then hop over to the Delightful Challenges site and check out this weeks challenge.


Have a Great Day!
NancyD

Tuesday, October 16, 2012

Happy 3rd Anniversary Creative Craft

Today at Creative Craft we are celebrating the 3rd anniversary of the challenge blog. My card is celebrating with a Stampin Dragon image with three balloons.


I tried the background stipple technique with my Copics.  I can see that I still need to practice but it does help the image to pop out a little.

Card Recipe:
Image: Dragon
Paper: Bazzill, Basic Grey Life of the Party
Markers/Inks: Distress Tea Dye, Copics - G20, G21, G24, G28, Y00, Y02, Y06, R20, R24, R29, E51, E53, T1, T3, B0000
Embellishments: Spellbinders Grand Label 23, Wild Orchid charm, craft store pins and ribbon, Prima Pearls,


Our sponsor this week is Stampin Dragon and Robyn's Fetish. Hop on over to the Creative Craft Challenge blog and check out all the great inspiration by the Design Team.

Challenges for this card:
Have a Great day!
NancyD

Monday, October 15, 2012

A Sassy Trick or Treat

Sassy Studios is sponsoring our challenge over at Love to Create.  So the design team inked up some great images from the store.  I chose the Canadian Mountie because it seemed a natural costume for one living in Canada.


Card Recipe:
Image: Eureka Pumpkin Fence and Sentiment
Paper: Bazzill, Memory Box Blackbird
Markers/Inks: Copics - Y17, R39, R37, R35, C1, C3, C5, C7, C8, E00, E02, G03, E57, E53, E50, E11, E33, E35, Distress Tea Dye
Embellishments: Spellbinders Fleur de Lis, Really Reasonable Ribbon, Pin, SU pearls


Our sponsor this week is Eureka Stamps. Hop on over to the Love to Create challenge blog and check out all the great inspiration by the Design Team.


Challenges for this card:
Have a Great day!
NancyD

Friday, October 12, 2012

Bugs Are Friends Too!

This is a "just because" card that I made today with a Di's Digi image.  I actually inked her up in the summer but only just now had time to make her into a card for a friend.


I followed the sketch on Charisma Cards to make this card.

Card Recipe
Images: Di's Digi
Paper: SU Very Vanilla, Simple Stories Baby Steps
Markers/Ink: Copics - E50, E53, E00, E01, R81, R83, R85,R46, C7, Y38, Y15, G09, G14, dog - E11, E13, E15, Distress Tea Dye
Embellishments: ZVA pearl spray, Wild Orchid flowers, MS leaf punch, Prima pearls, Crealies In Shape die


Challenges for this card:

I am glad you stopped by today!
NancyD


Wednesday, October 10, 2012

Wishing You a Sweet Christmas

Joyful Joey is wishing you a sweet Christmas.  This is another one of the new images over at Digital Delights this month.  


Card Recipe
Paper: Bazzill, Echo Park Holly Jolly Christmas
Markers/Ink: Copics - R39, R37, R35, E57, E53, E50, E27, E23, E21, E11, E00, G99, G24, G21, G20, W0, W3, W6, Distress Broken China and Tea Dye
Embellishments: Spellbinders Labels 23 and Heirloom Ornaments, Lace, Stickles, Ribbon


Challenges for this card:
Be sure and take a look at what the wonderful Design Team has come up with for your inspiration.  And then hop over to the Delightful Challenges site and check out this weeks challenge.


Have a Great Day!
NancyD

Monday, October 8, 2012

Fall Fun at Love to Create

I really had fun making this card.  I wanted to do something a bit different and so I got out my Spellbinders and "went to town" so to speak!

This great Eureka Stamps image was great to work with.  It has a little bit of shading already added in the design which made it easy to figure out where the shadows were.  The leaves are all from a new Spellbinders Foliage Two and the sentiment is backed by the new Resplendent Rectangles.


Card Recipe:
Image: Eureka Pumpkin Fence and Sentiment
Paper: Bazzill Orange, the green check is a scrap and I think it is Graphic 45
Markers/Inks: Copics - E29, E31, E35, E37, YR21, YR18, YR14, YR12, W5, G99 to color the pearls, W5, Adirondack Acqua for the sky, Distress Pine Needles, Pealed Paint and Forest Moss
Embellishments: Spellbinders Resplendent Rectangles, Scalloped Rectangles and Foliage Two, Spellbinders Grand Scalloped Circles, Craft store lace, Sizzix die for the little butterfly, Wild Orchid pearl sprig, Really Reasonable Ribbon (tied with Bow Easy), Craft Sunflowers 


Our sponsor this week is Eureka Stamps. Hop on over to the Love to Create challenge blog and check out all the great inspiration by the Design Team.


Challenges for this card:
Have a Great day!
NancyD

Sunday, October 7, 2012

Majestic Mountains for Craft a Scene Challenge

Today begins a new challenge over at the Craft a Scene challenge blog and the theme is Majestic Mountains.  We also just announced a few new design team members - Sally, Maggie and Manderly. Hope over and have a look at all the wonderful work from the design team.

For my card I wanted to make an evening mountain scene.  I have only made one other night scene and this time I wanted the daylight colors to shine through a little.  I used all Stampscapes images and PanPastels to color the scene.  It is matted and ready for framing.  I would have framed it myself except that it is for my swap partner on the Stampscapes II Yahoo group.


I worked really hard on keeping the white highlights from the moon shining on the water.  It is a tricky thing to accomplish!


Card Recipe:
Images: all Stampscapes images
Paper: Cryogen White for the scene, Michael's white and black
Inks: PanPastels, White gel pen for the highlights

Have a go at making your own mountain scene and then enter it into the challenge over at Craft a Scene.  Don't forget to check out the new design team while you there.

Challenges for this project:

Have a great Sunday!
NancyD